
My quandary was "how do I design and build these massive wood doors in the first place" Well, the basic idea was fairly simple, but plans would be needed, so I tinkered around w/ some CAD dwgs and got my design and cut list on paper. One of the beauties of Autocad is that you can dimension a dwg, then "stretch" things around and the dimensions will change accordingly....Thus I was able to fit a "square peg" into an oblique opening..yes grasshopper, the opening in which these doors were to fit was not exactly "square"...but damn if the doors aren't.....here's a pic of my plan drawing....the following pix are how I put the plan into action....


Here's the initial frame for the door, notice diagonals on underside that keep it square during construction....

Joinery, corners are rabbets, sides are dados and intersections are "halved joints"

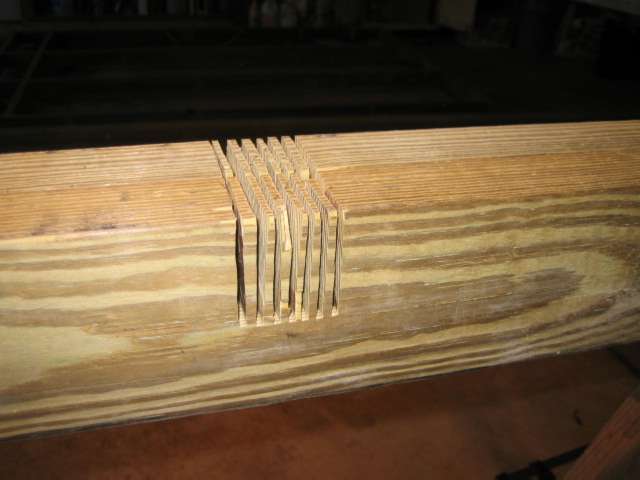
Here's a dado............

Corner rabbet, screwed and glued..

Slight mishap....I was screwing the frame together and had rotated some 2x4 blocks on edge to facilitate screwing w/ a power drill...the frame rolled and caught my poor finger in the process...OUCH!! first shot is after 3 days (green stuff is golden seal root) next shot is after one week..my advice..wear gloves when doing heavy carpentry......


Here's how you cut a dado w/ a circular saw, hand chisel is used to clean out the joint.....
Wire turnbuckle thru frame for diagonal tension to prevent sagging in the future, heavy angle brace on frame where hinge will be thru bolted.

Plywood facia going on. Note "wild" end by the saw, easy enough to come back w/ saw and trim to fit after the plywood is attached.

Plywood finished out.....

I added a 5/4 x 6" deck board on the inside back hinge side for strengthening....also providing a more solid surface for thru bolts/washers on the hinges.

Liquid nail rules!!!

I love clamps, but when you have fresh adhesives on mating surfaces, things try to move on you!!!!

Priming time..

Hinges getting on, that's one big ass drill bit...needed it to get a 5/16" hole thru all that door and frame....

Might as well be anal and liquid nail the hinges (for waterproofing)..

Thru bolting hinges......

Primed, hinged and ready for a hangin!!!.....

Prepped opening

2x4 Blocks clamped in place so door can't fall outwards...

Hanging time.....!!!

Shimming from the bottom so that the door will be level, lot of head scratching at this point, wound up putting the outer edge 1/2" or so high to allow for sag once the weight of the door applied force on the hinge side...

Door in level, upper beam is not....

inside view, note structural design for hinge side

Weeks later, Door number 2, finished and ready to hang

Inside view of hung doors

Outside finished doors, ready for trim and paint.


I built a "Conan" style 2x4 slider bolt lock, also added diagonals for added support as well as a handle to hold the doors during opening..

Finished inside, also turned out to be a great clamp rack....

Facia Trim on the outside...

Shaping Up...

Primed!!!

20 Gallons of Sherwin Williams 25 year Exterior latex Mistints....cost??? $20 New Retail?? About $400

Mixing in a trash can

Let the painting begin...we scammed some pigment from Lowes and adjusted the final color to "Barn Green" a.k.a. Avocado...at +/- $100 for a new 5-gal bucket of paint....Mistints RULE!!!

Double Coating, we used an 18" Roller, 3 guys, 2 coats, 6 hours.....

A Shop is Born

To be continued......